
Have you been trying to understand how to place Response Magic on your site? Every time you try you seem to be missing something? That is okay because I am going to walk you through it right here! Yes that’s right I am going to give you step by step instructions on how to add Response Magic to your site.
The Beginning
So I know the youtube video says for you to copy and paste the Thank You page. No Need! We have improved the system and made it so you already have the thank you page waiting for you on your site. Next question, How do you find it? That is a fantastic question!
The Thank You Page

First, you will need to login to your Admin dashboard for your WordPress website. On the left-hand side of the dashboard is a list of options, locate pages and click it. This is where you will find the list of pages. There will be several pages of these pages. At the top right corner, you will see a search box, put your cursor in the box and type “Thank” then click the search button or hit the “enter” button on the keyboard. Now you should see a “thank you.” Click on it to open it up. From there you will be able to edit the page. The picture has the search box circled with an arrow pointing to it.
You will want to change the name of the website. You can choose what you would like to name your page, or just put your URL there. Make sure to change the name at the bottom of the page as well. Try reading the page, then add to or take away from the content so that it reflects what you would like it to say. Then click the “update” button on the top right-hand side of the screen to save your work.
View Your Work
Now, since all that is done, you are going to look for the “View Page” button at the very top in the greenish bar. Click that button to take you to the page. This is where you can see what your page will look like and also get your perma-link. The next step is to go to the Response Magic site and get set up. Go here so we can get your account set up..Its FREE!
Your Free Account
Now click on “Create My Free Account”, then enter your name and email. Create a Username and Password. Make sure to make a note about your username and password. Then click “Create My Account”. This will take you to the next page. DO NOT PUT A CREDIT CARD IN! Scroll down and locate the “No Thanks” button and click it. Now you should be directed to another page that says, “Get Started…” you will see a pink bar that asks you to verify your email address. You will need to go to your email. Find the email they sent you and click the link to verify your account. This will take you back to Response Magic where you will have access to everything you need to set up your account.
Form
You want to create a form and an email list. Let’s start with an email list….go to “Create”at the top of the page, and click on Email list. On the next page, you will be creating a title for your list. Put your URL or the name you created for your page, then click “Add List”.
Your new List will always be at the bottom of this page. Right now you only have one so that is not an issues but so you know when you add a new list you will find it at the bottom. You will need to fill out the info that is required, First and Last name, email and Confirmation URL. The email you use for this needs to be one you will be able to respond to so, if you need to set up a business email, do so now and then come back to us! It will look like the picture to the left.
Permalink
Your Confirmation URL is the Permalink…..What is a Permalink???? Go back to your “thank you” page. Make sure you are in the view site mode not in your admin dashboard. Now locate the address bar at the top of the page that has your .com in it. Highlight, copy, and paste that into the box for the Confirmation URL. Then click “Update”.
Next is the Opt-In form, so scroll up to the top and find “Create a customer magnet” and follow these steps. This is how people sign up for your emails and get updates about Your AWESOME offers!!
The Steps
Step 1: Select an existing list by clicking on “Select a list’ then click the list you just created.
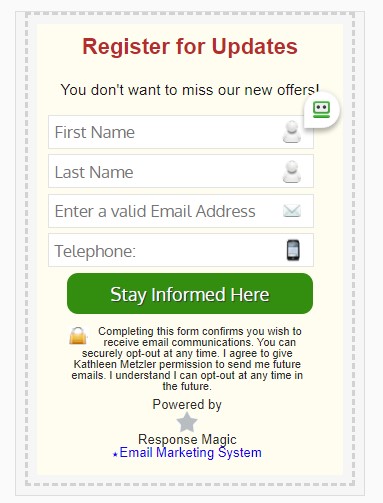
Step 2: Your Headline should be clear. Here is an example:“Register to be Updated as Offers are added.” You can copy this statement and paste it into the “Your Heading” box for Response Magic. I leave the text color red to draw attention.
Then there is a box that says, “Your Call to Action”. This is where you will put “You don’t want to miss our updates”. You can change the wording if you like, I kept it simple and to the point. In this part, you want to use only words not symbols including (” or ‘) and not too wordy. Go ahead and skip the YouTube part and leave it blank.
Step 3: Create Questions. This will give the visitor a list of items to complete. When you first start the list includes First Name, Last Name, and Email. You will also see that Email has a red flower. That is an indicator that the field must be completed. I also make First and Last Name mandatory by clicking on the flower. When you click in the box you are able to add more fields. I like to add City, State, and Phone. You have to click in the Create Questions box for each field you want to add.
Note: As you are making changes you will see a prototype on the right. Please review that form as you are editing the fields to make sure it is what you want to see on the form.
Step 4: Submit Button. Again, you will typing in a statement. Mine is Stay Informed Here. You can also change the background color if you like.
Step 5: There are a few questions and things to do on this part so we will go step by step…
- Privacy Statement – leave as is. Just verify that your name is there and not Rory’s.
- Select “NO” on the notifications everytime someone fills out the opt-in form.
- Select “NO” for the Facebook opt-in.
- On the What action do you want to take once the form is filled out and submitted, you want to click on the “Go to Custom URL”. You will need the Permalink (your page URL) for your “Thank you” page. Copy and paste this into the box next to Go to Custom URL.
The Response Magic Code
That is all of the information you will need to complete this. Before you click on Submit, scroll up and check the prototype form on the right to make sure you have what you need. If ok, click on “Submit & Get Code”. You will see a new page pop up. There is a box with what looks like gibberish typed in it, that is coding. You are going to highlight the whole thing, then copy it.
Great! We are almost done. You are going to go back to your admin dashboard for your blog site. On the left-hand side locate “Appearances”. A sub-menu will appear under the word “Appearances”. Now find “Widgets” and click that.
Place The Code
There will be TWO places to place the code. First, is “Left of Menu” which is your Home Page ONLY. “Right Content Sidebar” is all the other pages in your PBS. Click the + sign to add a box where you will paste the Response Magic code. Leave the “Title” box blank and paste the Response Magic Code in the “Content” area. Don’t forget to click the Save button at the bottom. OK! you are all done. You should have the Response Magic box on your page now. Go back to the public version of your PBS and refresh the screen. You should see the form on all of your pages.
Any questions, get with your Instructor.
